[WHS 네트워크기초] PCAP을 이용한 패킷 분석
#include <stdlib.h>
#include <stdio.h>
#include <pcap.h>
#include <arpa/inet.h>

const int data_length = 100; //표현할 데이터 길이입니다.

/* Ethernet header */
struct ethheader {
  u_char  ether_dhost[6]; /* destination host address */
  u_char  ether_shost[6]; /* source host address */
  u_short ether_type;     /* protocol type (IP, ARP, RARP, etc) */
};

/* IP Header */
struct ipheader {
  unsigned char      iph_ihl:4, //IP version
                     iph_ver:4; //IP header length
  unsigned char      iph_tos; //Type of service
  unsigned short int iph_len; //IP Packet length (data + header)
  unsigned short int iph_ident; //Identification
  unsigned short int iph_flag:3, //Fragmentation flags
                     iph_offset:13; //Flags offset
  unsigned char      iph_ttl; //Time to Live
  unsigned char      iph_protocol; //Protocol type
  unsigned short int iph_chksum; //IP datagram checksum
  struct  in_addr    iph_sourceip; //Source IP address
  struct  in_addr    iph_destip;   //Destination IP address
};

/* TCP Header */
struct tcpheader{
  unsigned short     tcp_sport; //TCP source port
  unsigned short     tcp_dport; //TCP destination port
  unsigned int       tcp_seqnum; //TCP sequence number
  unsigned int       tcp_acknum; //TCP acknowledgement number
  unsigned char      tcp_flagc:1, //TCP flag bit
                     tcp_reserved:3, // TCP reserved
                     tcp_dataoffset:4; //TCP data offset
  unsigned char      flags; //TCP flags
  unsigned short     tcp_winsize; //TCP window size
  unsigned short     tcp_chksum; //TCP checksum
  unsigned short     tcp_urgpointer; //TCP urgent pointer
};

struct httpheader{
  u_char data[data_length];
};

void printMacString(u_char* u){ //u_char 형식의 배열을 mac주소 형태의 string으로 반환합니다. (버퍼 필요)
  printf("%02X:%02X:%02X:%02X:%02X:%02X", u[0],u[1],u[2],u[3],u[4],u[5]);
}

void printDataHex(u_char* data){
  int line = 20;
  for(int i = 0;i<data_length;i+=line){
    for(int j = 0; j<line; j++){
      printf("%02X ", data[i+j]);
    }
    printf("\n");
  }
}

void printDataString(u_char* data){
  for(int i = 0;i<data_length;i++){
    printf("%c", data[i]);
  }
  printf("\n");
}


void got_packet(u_char *args, const struct pcap_pkthdr *header,
                              const u_char *packet)
{
  char buffer[20];
  struct ethheader *eth = (struct ethheader *)packet;

  if (ntohs(eth->ether_type) == 0x0800) {

    printf("=====================got tcp packet======================\n");

    printf("Ethernet Header : ");
    printMacString(eth->ether_dhost);
    printf(" / ");
    printMacString(eth->ether_shost);
    printf("\n");

    struct ipheader * ip = (struct ipheader *) (packet + sizeof(struct ethheader));

    printf("IP Header : %s / ", inet_ntoa(ip->iph_sourceip));
    printf("%s\n", inet_ntoa(ip->iph_destip));
    unsigned short int iplen = (ip->iph_ihl) * 4; //ip header의 값에 4를 곱하여 바이트로 표현합니다.

    struct tcpheader * tcp = (struct tcpheader *) ((char*)ip + iplen);

    unsigned short int tcplen = (tcp->tcp_dataoffset)*4; //tcp header의 값에 4를 곱하여 바이트로 표현합니다.

    printf("TCP Header : %d / %d\n" , ntohs(tcp->tcp_sport), ntohs(tcp->tcp_dport));

    printf("IP Header len : %d\n", iplen);

    printf("TCP Header len : %d\n", tcplen);

    struct httpheader * http = (struct httpheader *) (packet + sizeof(struct ethheader) + iplen + tcplen);

    if(ntohs(ip->iph_len)-(iplen)-(tcplen) > 0){ //데이터그램의 길이에서 ip헤더의 길이와 tcp헤더의 길이를 뺐을 때 0 이상이라면 데이터가 있음을 알 수 있습니다.
      printf("Data Found : \n");
      printf("hex data (%dbyte) : \n",data_length);
      printDataHex(http->data);
      printf("ASCII string data (%dbyte) : \n",data_length);
      printDataString(http->data);
    }
    else {
      printf("Data Not Found\n");
    }
    printf("=========================================================\n");
  }
}

int main()
{
  pcap_t *handle;
  char errbuf[PCAP_ERRBUF_SIZE];
  struct bpf_program fp;
  char filter_exp[] = "tcp";
  bpf_u_int32 net;

  handle = pcap_open_live("en0", BUFSIZ, 1, 1000, errbuf);

  pcap_compile(handle, &fp, filter_exp, 0, net);
  if (pcap_setfilter(handle, &fp) !=0) {
      pcap_perror(handle, "Error:");
      exit(EXIT_FAILURE);
  }

  pcap_loop(handle, -1, got_packet, NULL);

  pcap_close(handle);
  return 0;
}
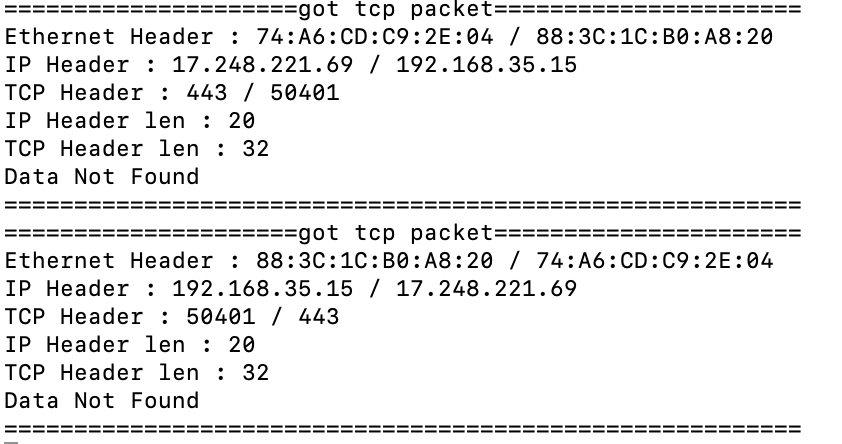
실행하면 이렇게 된다.

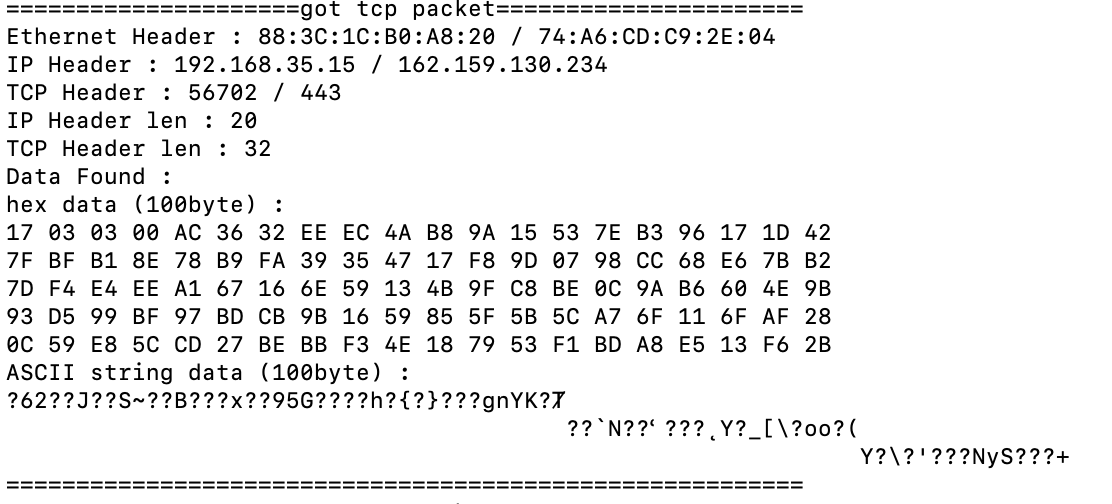
어쩌다 데이터가 있는 패킷을 잡으면 이렇게 뜬다. 아 참고로 데이터가 있는 패킷인지 아닌지는 ip헤더의 ip_len(데이터그램 크기)과 ip헤더 길이와 tcp헤더 길이로 판별한다.
ip_len-ip_headerlen-tcp_headerlen > 0이면 데이터가 있는 것이다.

다 좋은데 데이터를 읽을 수가 없다. 443번 포트니까 tsl/ssl 암호화에 의해 그런 것이다.
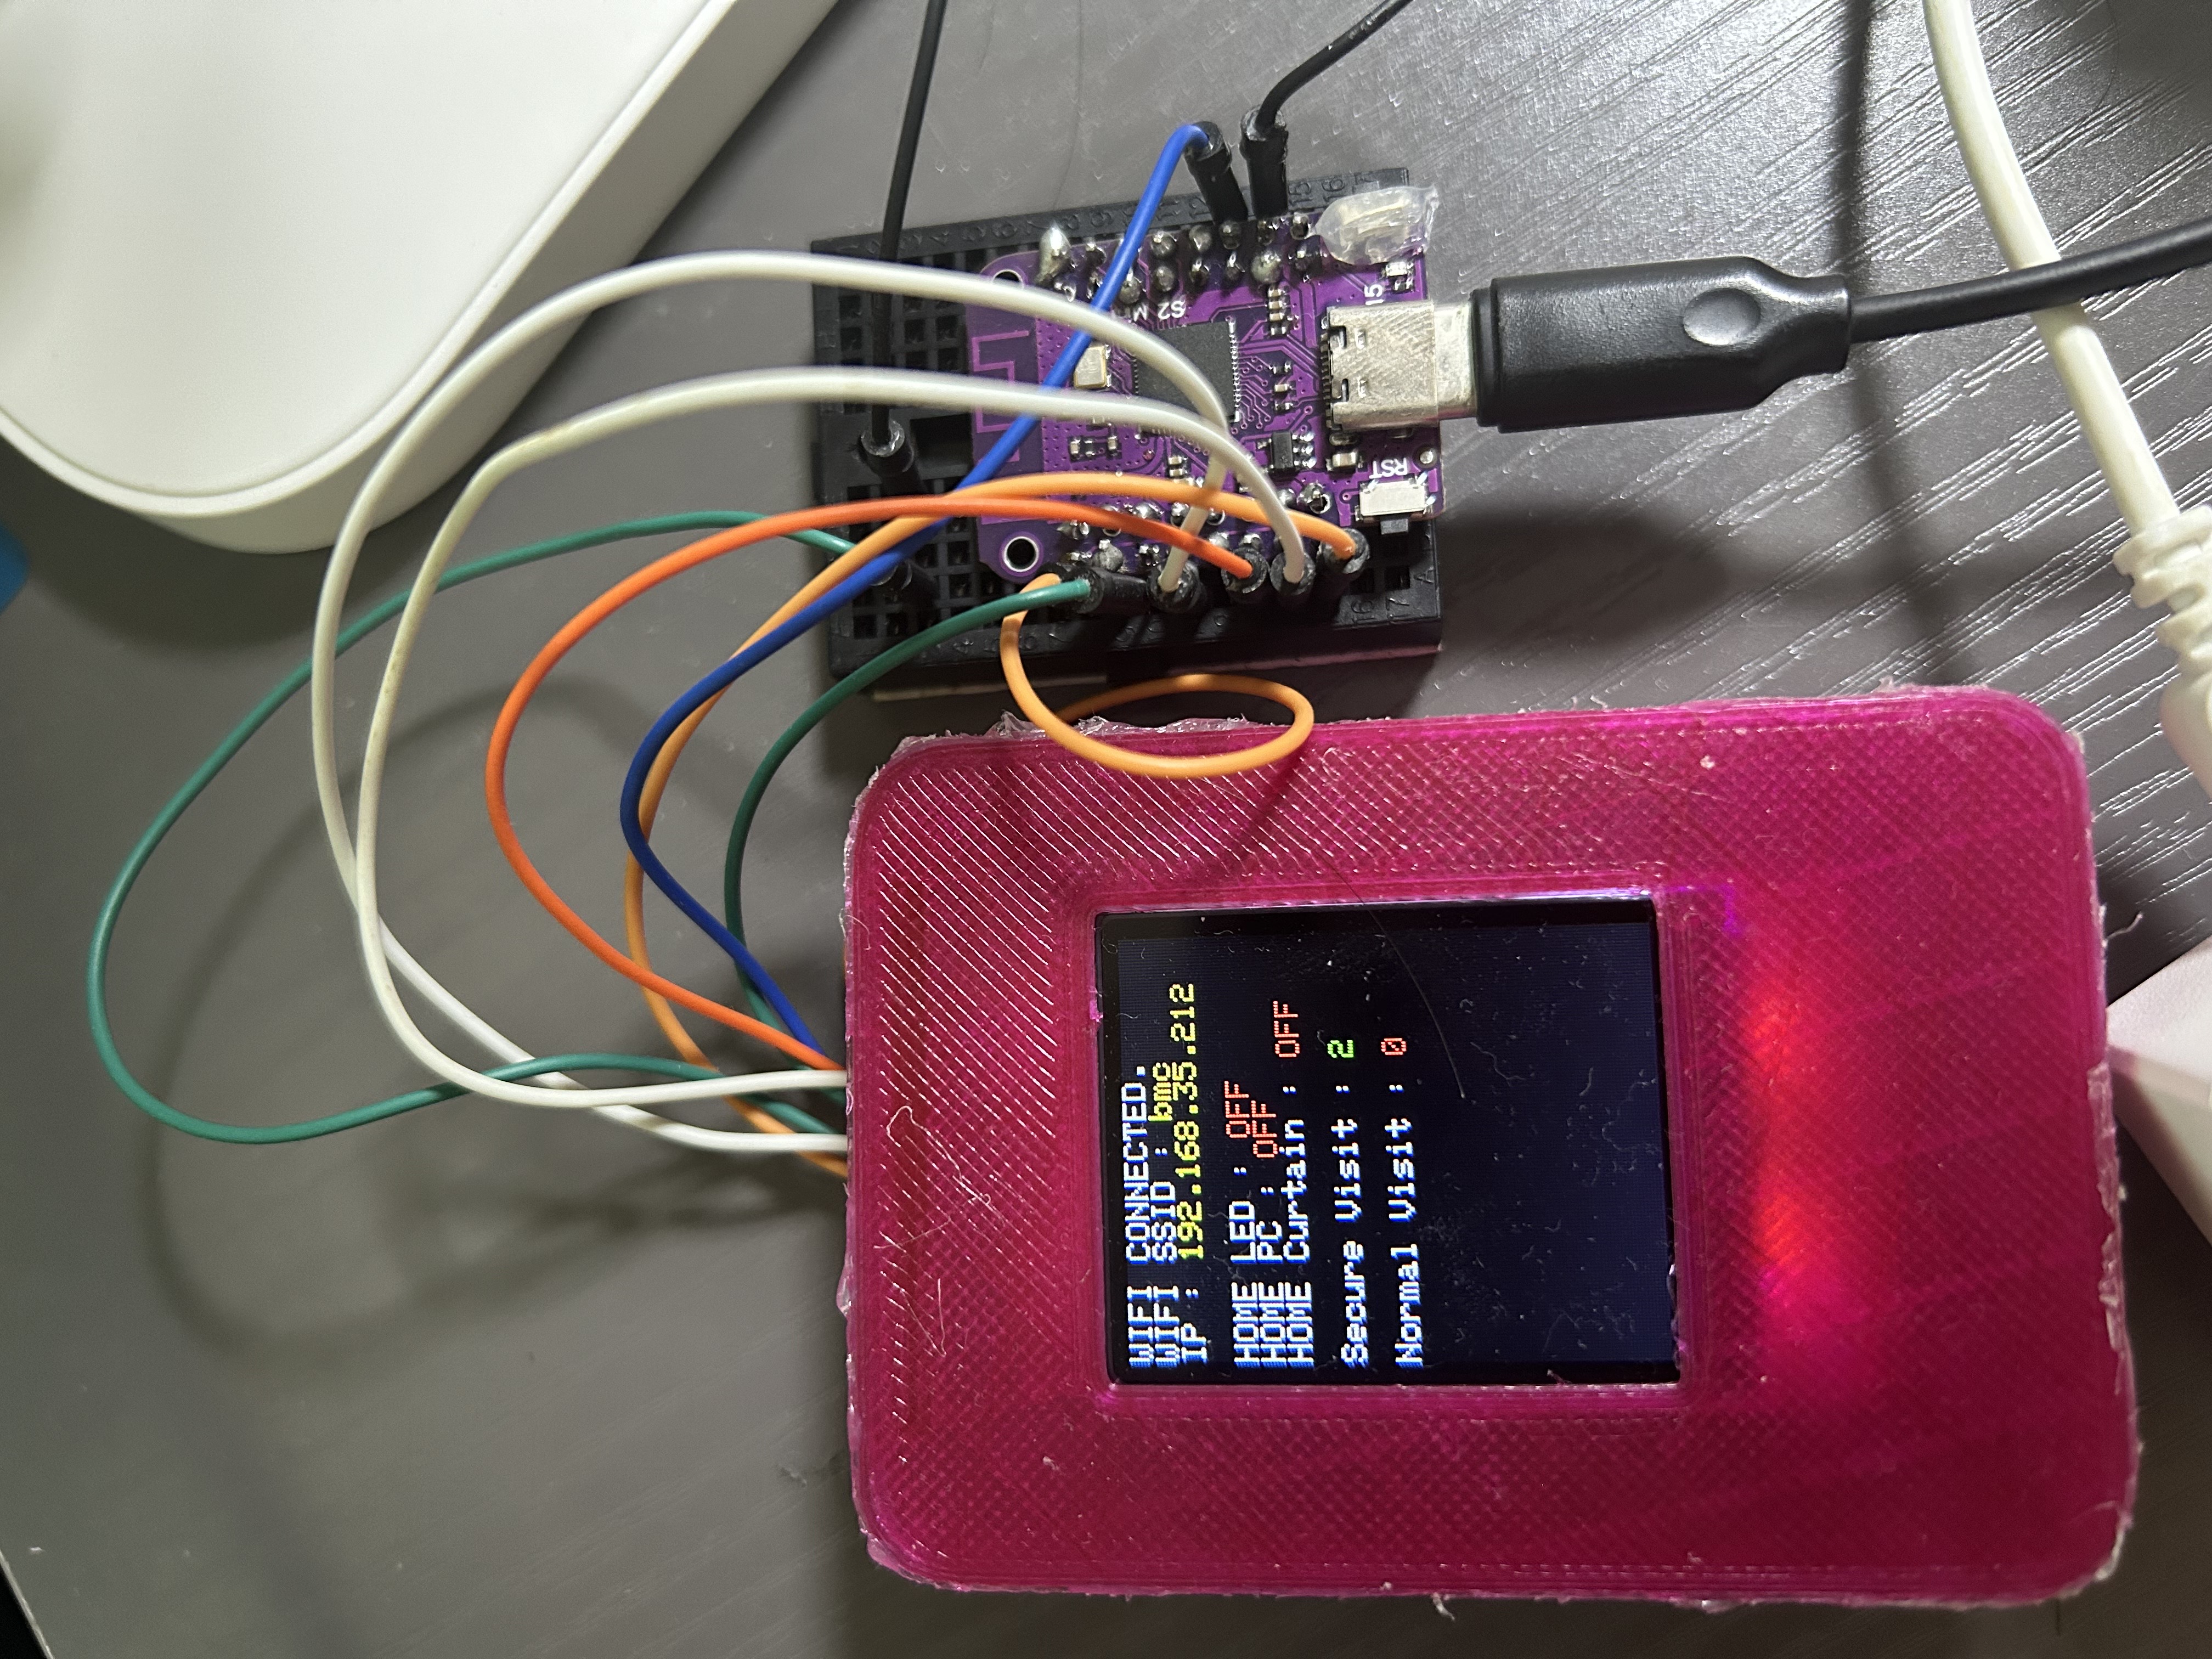
그래서 실제로 취약한 서버를 하나 열어보았다. ESP32라는 아두이노 모듈로 할 수 있는데, ESP32가 내장되어있는 LOLIN S2 MINI라는 제품을 사용했다. 사실 이거는 혼자 홈 IoT 만들면서 사용하던 부품이다. 사이즈도 작은게 꽤 많은 기능을 수행할 수 있다. 지금은 LCD가 연결되어있다. 이것도 부품을 사서 3d프린터로 케이스를 만들었다.

요거
그래서 아두이노 코드도 뚝딱 짜면, 이런 식이다.
#include <Adafruit_GFX.h>     // Core graphics library
#include <Adafruit_ST7735.h>  // Hardware-specific library for ST7735
#include <Adafruit_ST7789.h>  // Hardware-specific library for ST7789
#include <SPI.h>
#include <WiFi.h>
#include <string.h>
#include <ESP32_Servo.h>

#define TFT_CS 7
#define TFT_RST 16
#define TFT_DC 5
#define TFT_MOSI 11  // Data out
#define TFT_SCLK 12  // Clock out

static const int servoPin = 39;
const char* ssid = "bmc";
const char* password = "********";
char isLed[10] = "OFF";
char isPc[10] = "OFF";
char isCurtain[10] = "OFF";
int visitCnt = 0;
int uvisitCnt = 0;  //for unexpected visit
WiFiServer server(80);
Adafruit_ST7735 tft = Adafruit_ST7735(TFT_CS, TFT_DC, TFT_MOSI, TFT_SCLK, TFT_RST);
Servo servo;
void drawtextzero(char* text, uint16_t color) {
  tft.setCursor(0, 0);
  tft.setTextColor(color);
  tft.setTextWrap(true);
  tft.print(text);
}

void drawtextcontinue(char* text, uint16_t color) {
  tft.setTextColor(color);
  tft.setTextWrap(true);
  tft.print(text);
}

void setup() {
  char setupbuffer[500];
  pinMode(2, OUTPUT);
  digitalWrite(2, HIGH);
  Serial.begin(115200);
  servo.attach(39);
  servo.write(value);
  delay(10);
  tft.initR(INITR_BLACKTAB);
  // We start by connecting to a WiFi network
  Serial.begin(115200);
  servo.attach(servoPin); // D27에 서보모터가 연결되었습니다.

  Serial.println();
  Serial.println();
  Serial.print("Connecting to ");
  Serial.println(ssid);
  IPAddress local_IP(192, 168, 35, 212);  // ESP32가 사용할 IP address
  IPAddress gateway(192, 168, 35, 1);     // Gateway IP address (공유기 IP주소)
  IPAddress subnet(255, 255, 255, 0);     // subnet mask
  if (!WiFi.config(local_IP, gateway, subnet)) {
    Serial.println("STA failed to configure");
  }
  WiFi.begin(ssid, password);
  while (WiFi.status() != WL_CONNECTED) {
    strcpy(setupbuffer, "connecting...");
    tft.fillScreen(ST77XX_BLACK);
    drawtextzero(setupbuffer, ST77XX_WHITE);
    delay(500);
    strcpy(setupbuffer, "connecting. . .");
    tft.fillScreen(ST77XX_BLACK);
    drawtextzero(setupbuffer, ST77XX_WHITE);
    delay(500);
  }
  updateStr();
  Serial.println("");
  Serial.println("WiFi connected.");
  Serial.println("IP address: ");
  Serial.println(WiFi.localIP());

  server.begin();
}

void updateStr() {
  char wifiIp[100];
  char buffer[500];
  strcpy(wifiIp, WiFi.localIP().toString().c_str());
  strcpy(buffer, "WIFI CONNECTED.\nWIFI SSID : ");

  tft.fillScreen(ST77XX_BLACK);

  drawtextzero(buffer, ST77XX_WHITE);
  strcpy(buffer, ssid);
  drawtextcontinue(buffer, ST77XX_YELLOW);
  strcpy(buffer, "\nIP : ");
  drawtextcontinue(buffer, ST77XX_WHITE);
  strcpy(buffer, "");
  sprintf(buffer, "%s\n", wifiIp);
  drawtextcontinue(buffer, ST77XX_YELLOW);

  strcpy(buffer, "\nHOME LED : ");
  drawtextcontinue(buffer, ST77XX_WHITE);
  strcpy(buffer, "");
  sprintf(buffer, "%s\n", isLed);
  drawtextcontinue(buffer, strcmp(isLed, "OFF") == 0 ? ST77XX_RED : ST77XX_BLUE);

  strcpy(buffer, "HOME PC : ");
  drawtextcontinue(buffer, ST77XX_WHITE);
  strcpy(buffer, "");
  sprintf(buffer, "%s\n", isPc);
  drawtextcontinue(buffer, strcmp(isPc, "OFF") == 0 ? ST77XX_RED : ST77XX_BLUE);

  strcpy(buffer, "HOME Curtain : ");
  drawtextcontinue(buffer, ST77XX_WHITE);
  strcpy(buffer, "");
  sprintf(buffer, "%s\n", isCurtain);
  drawtextcontinue(buffer, strcmp(isCurtain, "OFF") == 0 ? ST77XX_RED : ST77XX_BLUE);


  strcpy(buffer, "\nSecure Visit : ");
  drawtextcontinue(buffer, ST77XX_WHITE);
  strcpy(buffer, "");
  sprintf(buffer, "%d\n", visitCnt);
  drawtextcontinue(buffer, ST77XX_GREEN);


  strcpy(buffer, "\nNormal Visit : ");
  drawtextcontinue(buffer, ST77XX_WHITE);
  strcpy(buffer, "");
  sprintf(buffer, "%d\n", uvisitCnt);
  drawtextcontinue(buffer, ST77XX_RED);

  //sprintf(buffer,"IP : ");IP : %s\n\nHOME LED : %s\nHOME PC : %s\nHOME Curtain : %s\n\nsecurevisit : %d\n",ssid,wifiIp,isLed,isPc,isCurtain,visitCnt)
}

void loop() {
  WiFiClient client = server.available();  // listen for incoming clients
  char buffer[10];
  if (client) {                     // if you get a client,
    Serial.println("New Client.");  // print a message out the serial port
    String currentLine = "";        // make a String to hold incoming data from the client
    while (client.connected()) {    // loop while the client's connected
      if (client.available()) {     // if there's bytes to read from the client,
        char c = client.read();     // read a byte, then
        Serial.write(c);            // print it out the serial monitor
        if (c == '\n') {            // if the byte is a newline character

          // if the current line is blank, you got two newline characters in a row.
          // that's the end of the client HTTP request, so send a response:
          if (currentLine.length() == 0) {
            // HTTP headers always start with a response code (e.g. HTTP/1.1 200 OK)
            // and a content-type so the client knows what's coming, then a blank line:
            client.println();
            client.println("HTTP/1.1 200 OK");
            client.println("Content-type:text/html");
            client.println();
            client.print("Hello.");
            client.println("this is http page from esp32");
            // The HTTP response ends with another blank line:
            client.println();
            // break out of the while loop:
            break;
          } else {  // if you got a newline, then clear currentLine:
            currentLine = "";
          }
        } else if (c != '\r') {  // if you got anything else but a carriage return character,
          currentLine += c;      // add it to the end of the currentLine
        }

        if (currentLine.endsWith("GET /vuln")) { //for test
          visitCnt++;
          client.println("this is vuln page");
          updateStr();
        }
      }
    }

    // close the connection:
    client.stop();
    Serial.println("Client Disconnected.");
  }
}
대단한 건 아니고, 들어가면 문자열을 html 형식으로 출력한다. 외에는 lcd 출력한다고 삽질한 흔적이다.
아무튼 그래서 브라우저로 들어가면,

이런 느낌으로 잘 된다.
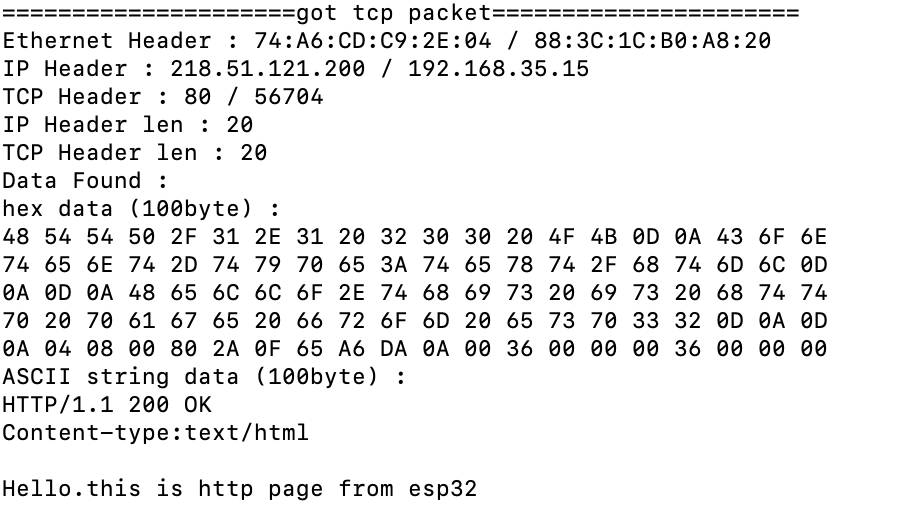
이때 패킷이 어떻게 잡혔나 확인해보면,

이렇게 잘 잡힌다. 아아 신기하여라